QuickBooks Online Integration Overview
The HubSpot QuickBooks integration allows you to sync your HubSpot and QuickBooks information bi-directionally to each other keeping your CRM and accounting systems in sync.
Sync HubSpot and QuickBooks Information Bidirectionally
Sync contacts and products bidirectionally between HubSpot and QuickBooks. Users can also sync invoices one-way from QuickBooks into HubSpot. When settings up the sync users will be able to set up settings for how the data syncs between systems. Post-set-up users will have access to what records are and aren't syncing and any sync errors they might have.
Automate the Creation of QuickBooks Records
With QuickBooks workflow actions users can automate the creation of QuickBooks estimates, invoices, and sales receipts. Users can set up these actions from right within our workflow tool and trigger these actions off of any workflow enrollment criteria.
Integration features
Compare features by HubSpot planSync creates and updates contact and products bidirectionally between HubSpot and QuickBooks. Invoices can also be synced but only one way from QuickBooks into HubSpot.

Control how your data syncs by adding sync settings and rules for how your contacts, products, and invoices sync between systems.

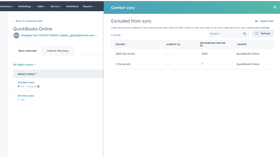
Understand how your data is syncing by reviewing what records have synced and resolving sync errors.
With QuickBooks workflow actions users can automate the creation of QuickBooks estimates, invoices, and sales receipts. Users can set up these actions from right within our workflow tool and trigger these actions off of any workflow enrollment criteria.
Shared data
How it works
Each object has field mappings that connect matching information from each app. Default mappings are listed below. If you want to change these default mappings or create your own, custom field mappings are available with Operations Hub Starter and up.
|
|
Contacts
|
|
|---|---|---|
| Default field mappings | ||
| Additional fields available with custom field mappings | ||
|
|
Products
|
|
|---|---|---|
| Default field mappings | ||
| Additional fields available with custom field mappings | ||
|
|
Invoices
|
|
|---|---|---|
| Default field mappings | ||
| Additional fields available with custom field mappings | ||
|
|
Products
|
|
|---|---|---|
| Default field mappings | ||
| Additional fields available with custom field mappings | ||
|
|
Products
|
|
|---|---|---|
| Default field mappings | ||
| Additional fields available with custom field mappings | ||
Use QuickBooks actions in HubSpot workflows
With the QuickBooks Online integration, you’re able to create QuickBooks invoices, estimates, and sales receipts using HubSpot workflows.
Please note: QuickBooks actions in HubSpot workflows are only available for customers based in the United States.
Contact and line item information in HubSpot is used to create invoices, sales estimates, and sales receipts in QuickBooks.
- For contacts: the First Name, Last Name and Email address contact properties are required to match a HubSpot contact record to a QuickBooks contact. A new contact will be created in QuickBooks if no match is found. If there are multiple contact records associated with the quote or deal record in HubSpot, the first associated contact will be used.
- For line items: line items in HubSpot must be associated to the quote or deal records enrolled in the workflow to create an invoice, sales estimate, or sales receipt in QuickBooks. HubSpot will match a line item in HubSpot with the product in QuickBooks. If no match is found, the invoice, sales estimate, or sales receipt will not be created.
It is recommended that product sync in turned on in your QuickBooks settings, and QuickBooks products are used for deal and quite line items to ensure that an invoice, sales estimate, or sales receipt is created.
Add QuickBooks actions to your deal or quote-based workflow
You can add QuickBooks actions to HubSpot workflows to create an invoice, sales orders, or estimates in your QuickBooks account. To add these actions:
- In your HubSpot account, navigate to Automation > Workflows.
- Click the name of a workflow to edit an existing workflow. Or click Create workflow to create a new workflow.
- Click the plus icon +.
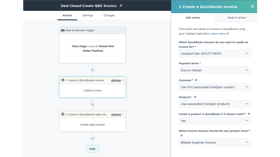
- In the right panel, select a QuickBooks action:
- To create an invoice, click Create a QuickBooks invoice.
- To create an estimate, click Create a QuickBooks estimate.
- To create a sales receipt, click Create a QuickBooks sales receipt.
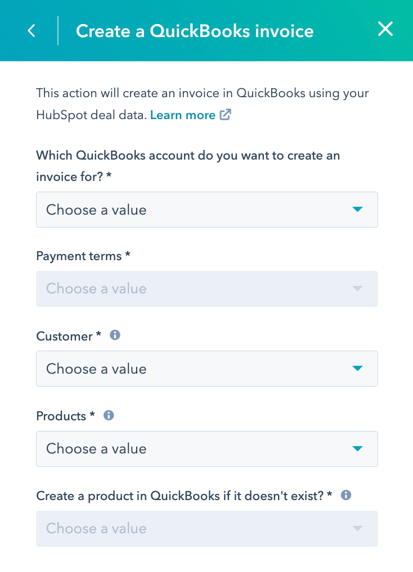
- Click the Which QuickBooks account do you want to create an invoice/estimate/sales receipt for? dropdown menu and select the QuickBooks account.
- Click the Payment Terms dropdown menu and select a value (only available for the Create a QuickBooks invoice action).
- Click the Customer dropdown menu and select a customer.
- Click the Products dropdown menu and select a product.
- Click the Create a product in QuickBooks if it doesn’t exist? dropdown and select either Yes or No.
- Click Save.
- Finish editing your workflow, then click Review and publish to review the workflow.
- Click Turn on to turn the workflow on.
Please note: HubSpot will use the first associated contact on a deal/quote to create the invoice. If no matching contact is found in QuickBooks, a new one will be created.
To enroll a paid quote in a workflow:
- In your HubSpot account, navigate to Automation > Workflows.
- To create a new workflow, in the upper right, click Create workflow.
- In the left panel, select Quote-based.
- In the right panel, select your workflow type.
- Click the pencil icon to give your workflow a name, then click Next. You'll then be taken to the workflow editor.
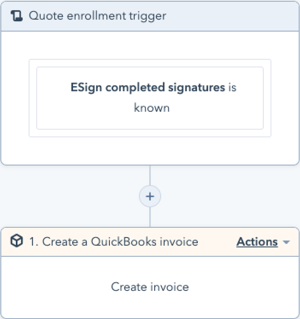
- In the workflow editor, click Set up triggers.
- In the Filters section, select Quote > Esign completed signature, then select is known.
To enroll a paid deal in a workflow:
- In your HubSpot account, navigate to Automation > Workflows.
- To create a new workflow, in the upper right, click Create workflow.
- In the left panel, select Deal-based.
- In the right panel, select your workflow type.
- Click the pencil icon to give your workflow a name, then click Next. You'll then be taken to the workflow editor.
- In the workflow editor, click Set up triggers.
- In the Filters section, select Deal > Deal name, then contains any of Payment Link.

Using QuickBooks actions with HubSpot payments
You can also create paid invoices and sales receipts using workflows if you have the HubSpot payments tool set up. Sales receipts can be created for all types of products. Paid invoices can only be created for non-taxable line items.
Currently, payments is only available to businesses or organizations located in the US that have a US bank account and are using a paid version of HubSpot.
Please note: it is only possible to use these actions with payments-based workflows.
If you have the HubSpot payments tool set up:
- In your HubSpot account, navigate to Automation > Workflows.
- To create a new workflow, in the upper right, click Create workflow.
- In the left panel, select Payment-based.
- Click the pencil icon to give your workflow a name, then click Next. You'll then be taken to the workflow editor.
- Select your chosen triggers.
- Click the plus icon +.
- In the right panel, select a QuickBooks action:
- To create an invoice, click Create a QuickBooks paid invoice. This will create a paid invoice in QuickBooks using your HubSpot payment data.
- To create a sales receipt, click Create a QuickBooks sales receipt. This will create a sales receipt in QuickBooks using your HubSpot payment data.
- Click the Which QuickBooks account do you want to create an invoice/sales receipt for? dropdown menu and select the QuickBooks account.
- Click the Customer dropdown menu and select a customer.
- Click the Products dropdown menu and select a product.
- Click the Create a product in QuickBooks if it doesn’t exist? dropdown and select either Yes or No.
- Click Save.
- Finish editing your workflow, then click Review and publish to review the workflow.
- Click Turn on to turn the workflow on.
Create a QuickBooks expense in a HubSpot workflow
You can also create a QuickBooks expense with a HubSpot workflow action. This action will create an expense in QuickBooks to reflect your HubSpot payment fee. To create an expense:
- In your HubSpot account, navigate to Automation > Workflows.
- To create a new workflow, in the upper right, click Create workflow.
- In the left panel, select Payment-based.
- Click the pencil icon to give your workflow a name, then click Next. You'll then be taken to the workflow editor.
- Select your chosen triggers.
- Click the plus icon +.
- In the right panel, select Create a QuickBooks expense.
- Fill out the required fields.
- Click Save.
Create refund receipts in QuickBooks
To create a refund receipt in QuickBooks when a full refund occurs in HubSpot payments:
- In your HubSpot account, navigate to Automation > Workflows.
- To create a new workflow, in the upper right, click Create workflow.
- In the left panel, select Payment-based.
- Click the pencil icon to give your workflow a name, then click Next. You'll then be taken to the workflow editor.
- Select your chosen triggers.
- Click the plus icon +.
- In the right panel, select Create a QuickBooks refund receipt.
- Fill out the required fields.
- Click Save.